Supply and Demand
Before price can make an impulsive move in one direction, it usually spends time resting somewhere first, a stretch of chop where buyers and sellers are roughly matched, and that resting spot is what a supply or demand zone marks. It’s a close cousin of the order block, covering the same underlying idea, but drawn around the whole base rather than a single candle.
What the zone represents
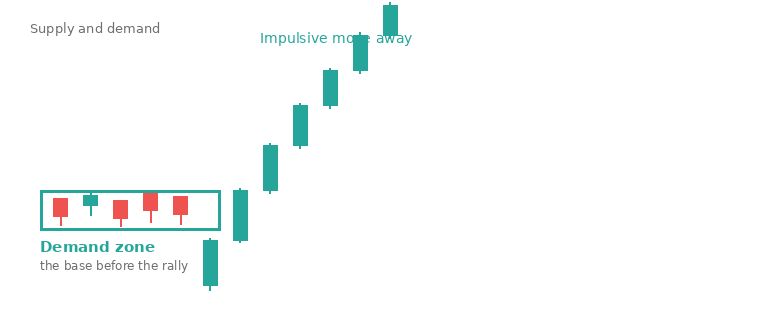
A demand zone: the ranging base before an impulsive rally. A supply zone is the same idea before an impulsive decline.
A demand zone is a base that price rallies away from, and the read is that buyers were accumulating there faster than sellers could absorb it, until the imbalance tipped and the market moved. A supply zone is the mirror image, a base that price falls away from, sellers building up until they overwhelmed the buyers holding the level.
The strength of the move away from the zone matters more than how the zone itself looks. A slow grind up out of a base isn’t nearly as telling as a sharp, wide-ranging rally that leaves the base behind in a handful of candles, since that speed is the evidence an imbalance was there.
Zone or order block?
An order block is the last single candle against the move, a narrow, precise definition. A supply or demand zone is broader, the whole consolidation the move launched from, which can be one candle or a dozen. Neither is more correct, they’re just different resolutions of the same observation, and which one you reach for often comes down to how cleanly the base is defined. A tight, obvious base earns a zone. A single sharp reversal candle earns an order block.
Fresh zones over tested ones
A zone that hasn’t been revisited since it formed is considered fresh, and it tends to react more reliably than one price has already returned to once or twice. The common explanation is that the first visit uses up whatever unfilled orders were left behind, so each additional test has less behind it, and while that’s a model, not a proven mechanism, it holds up often enough in practice to treat a fresh zone with more weight than a tested one.
Confluence still does the heavy lifting
A zone sitting in open space, with nothing else around it, is a level to watch rather than trade. A zone that lines up with a break of structure, a fair value gap, or a round number the market has respected before is a different situation, because now several separate pieces of evidence are pointing at the same small area of the chart, and that overlap is what turns a zone from a guess into a plan.
Key takeaways
- A demand zone is the base price rallies away from; a supply zone is the base it falls away from
- The strength of the move away from the base is the real evidence, not the shape of the base itself
- Zones are broader than order blocks, covering the whole consolidation instead of one candle
- Fresh, untested zones tend to react more reliably than zones price has already revisited
- A zone alone is a level to watch; a zone with confluence is a level to trade
Nothing on this page is financial advice. Trade your own account, manage your own risk.
Nothing on this page is financial advice. Trade your own account, manage your own risk.